
Windows Installation Process
We recommend using the CodeKit VSCode extension to install SiFli-SDK and related tools.
Installation Prerequisites
uv Environment
Windows users do not need to pre-install system Python for the SDK scripts anymore. The supported workflow uses uv to provision the SDK-managed Python runtime on demand.
To install uv, run the following command in PowerShell::
powershell -ExecutionPolicy ByPass -c "irm https://astral.sh/uv/install.ps1 | iex"
After installing uv, run the following command in PowerShell to verify it is available:
uv --version
Note
uv is an extremely fast Python package and project management tool written in Rust. For more installation instructions, refer to the official uv documentation.
Git Environment
If Git is not installed, please refer to the Git official website to download and install Git. After installation, make sure to add Git to the system’s environment variables.
Note
For domestic users in China, you can use the following domestic mirror link to download Git installer: https://mirrors.huaweicloud.com/git-for-windows/v2.47.0.windows.1/Git-2.47.0-64-bit.exe. Keep the default installation options each time.
After installation, you can run the git --version command in the terminal to check if Git is installed successfully. Normally, it should output Git version information, such as:
git version 2.47.0.windows.1
Terminal Setup
SiFli-SDK script installation only supports powershell.
For terminal choice, we recommend using Windows Terminal. Users can also choose other terminals, such as the integrated terminal that comes with VSCode. However, Windows Terminal is more recommended. Note that in some newer Windows 10/11 versions, Windows Terminal is already pre-installed.
To open PowerShell, you can use the following methods:
Press the Win key or click the Windows icon in the lower left corner, type
powershell, then click to open PowerShell terminal.Press Win + R key combination to open the Run window, type
powershell, then click OK.
If you are using Windows Terminal, you can directly open PowerShell in the terminal. To open the terminal, you can press the Win key or click the Windows icon in the lower left corner, type terminal, then click to open Windows Terminal.
If you encounter the error message
Cannot load file C:\OpenSiFli\SiFli-SDK\export.ps1 because running scripts is disabled on this system. in the subsequent script running steps, or if you have never heard of or run .ps1 scripts before, please open PowerShell terminal in administrator mode and run the following command:
Set-ExecutionPolicy RemoteSigned
Then type Y and press Enter to gain permission to run scripts.
Get SiFli-SDK
Before building applications around SF32, please first obtain the software library files provided by SiFli from the SiFli-SDK repository.
Get a local copy of SiFli-SDK: Open terminal, switch to the working directory where you want to save SiFli-SDK, and use the git clone command to clone the remote repository. Generally, we recommend using code from the release branch to get the latest stable version.
Warning
Since SiFli-SDK contains submodules, you cannot obtain the complete code by downloading the zip package.
Open PowerShell terminal and run the following commands:
mkdir -p C:\OpenSiFli
cd C:\OpenSiFli
git clone --recursive -b release/v2.4 https://github.com/OpenSiFli/SiFli-SDK
Note
The above SDK path is for example only, users can choose the path according to their needs.
If accessing GitHub is slow in China, you can use the gitee mirror to clone SiFli-SDK. Please use the following command:
git clone --recursive -b release/v2.4 https://gitee.com/SiFli/sifli-sdk
Note that the SiFli-SDK repository path on gitee is all lowercase, so you need to pay attention to case sensitivity when SiFli-SDK appears later.
Note
If you want to switch to other branches (e.g., development branch), you can use the checkout command, for example:
git checkout main
or
git checkout release/v2.3
Note
Note that SiFli-SDK contains some submodules, so you need to use the --recursive parameter to clone all submodules. If you forgot this parameter when cloning, you can run the following command after cloning to initialize the submodules:
git submodule update --init --recursive
Install Tools
In addition to SiFli-SDK itself, you also need to install various tools used by SiFli-SDK for projects supporting SF32, such as compilers, debuggers, Python packages, etc.
cd C:\OpenSiFli\SiFli-SDK
.\install.ps1
install.ps1 will:
install the Python runtime and dependencies required by the SDK
install the compiler, debugger, and other tools that match the current SDK version
prepare the Conan environment used for build dependencies
save SDK environment information under
SIFLI_SDK_TOOLS_PATHfor later environment export
An SDK environment is the Python runtime, toolchain, debug tools, and build dependencies prepared for the current SDK. For the first install, run .\install.ps1.
After updating the SDK, plain .\install.ps1 prepares or switches to the matching environment for the updated SDK. If an older environment is currently selected, it is not modified in place, so older SDK checkouts can keep using it.
If you explicitly want to update the currently selected environment in place, run:
.\install.ps1 update
If that environment is also used by another SDK checkout, the script creates a new environment instead so the other checkout is not affected.
If you need to build with Keil/ARMCLANG, record the Keil root during installation. The directory must already exist and contain ARM\ARMCLANG\bin:
.\install.ps1 --keil C:\Keil_v5
The command above records Keil for the current SDK environment. To update the currently selected old environment and record Keil at the same time, run:
.\install.ps1 update --keil C:\Keil_v5
Clean Old Environments and Cache (Optional)
After SDK updates, you can remove old environments that are no longer needed:
.\install.ps1 uninstall
This command deletes old environments for the current profile immediately, while keeping the environment that matches the current SDK and any environment still selected by another SDK checkout. To preview the cleanup without deleting anything, run:
.\install.ps1 uninstall --dry-run
To clean old environments for all profiles when they are not selected by any SDK checkout, run:
.\install.ps1 uninstall --all
You can preview the all-profile cleanup first:
.\install.ps1 uninstall --all --dry-run
To remove every SDK-managed environment, including the current environment and environments still selected in the state file, run:
.\install.ps1 uninstall --all --force
--all --force makes every SDK environment invalid and clears environment selections in the state file. Run .\install.ps1 again before exporting. “Still in use” is based on the state file under SIFLI_SDK_TOOLS_PATH; open shells or running processes are not detected.
To also clean download cache files and leftover staging directories, add --cache:
.\install.ps1 uninstall --cache
--cache keeps tool archives and the Conan config package required by the current SDK, and it does not remove installed tool directories. If you use a custom SIFLI_SDK_TOOLS_PATH, set the same variable before running cleanup.
Note
Domestic users in China can use the following commands to enable the bundled China mirror preset and avoid slow downloads from default sources. Note that if you choose to execute the following commands, you do not need to execute the commands in the above code block.
cd C:\OpenSiFli\SiFli-SDK
$env:SIFLI_SDK_MIRROR_CHINA="1"
.\install.ps1
When enabled, this preset forcefully overrides the following environment variables:
SIFLI_SDK_GITHUB_ASSETS="https://downloads.sifli.com/github_assets"SIFLI_SDK_PYPI_DEFAULT_INDEX="https://mirrors.ustc.edu.cn/pypi/simple"
If you do not want the bundled preset, you can still set the fine-grained mirror variables manually.
Custom Tool Installation Path (Optional)
The script described in this step installs the compilation tools required by SiFli-SDK in the user’s home directory by default, which is the $HOME/.sifli directory in *nix systems, or C:\Users\<name>\.sifli in Windows. We can choose to install tools to other directories, but please export the environment variable SIFLI_SDK_TOOLS_PATH before running the installation script. Note that please ensure the user account has read and write permissions for that path.
$env:SIFLI_SDK_TOOLS_PATH="D:\SIFLI\tools"
.\install.ps1

.\export.ps1
If you modified the SIFLI_SDK_TOOLS_PATH variable, please export this variable to the environment variables before running any SiFli-SDK tools or scripts.
Note
For Windows users, if your username contains spaces, Chinese characters, or other non-English characters, it is strongly recommended to set SIFLI_SDK_TOOLS_PATH to specify the tool installation path, otherwise it may cause installation failure or compilation errors. It is recommended to set this path to a pure English path, such as D:\SIFLI\tools.
Note
If environment variables are not exported, most shells will not support using SIFLI_SDK_TOOLS_PATH in variable assignments, such as SIFLI_SDK_TOOLS_PATH="$HOME/required_sdk_tools_path" ./install.ps1. Because even if the variable is exported or modified in the source script, the current execution environment is not affected by variable assignment.
Set Environment Variables
After the above steps, the SDK and related tools are installed, but their paths are not in the environment variables, so they cannot be used in any directory. Therefore, some environment variables must be set. This can be done through another script provided by SiFli-SDK.
Please run the following command in terminal windows where you need to use compilation or download commands:
cd C:\OpenSiFli\SiFli-SDK
.\export.ps1
Without -t, export.ps1 exports the GCC environment. This is equivalent to:
.\export.ps1 -t gcc
If you have recorded a Keil root with install.ps1 --keil, switch to Keil/ARMCLANG with:
.\export.ps1 -t keil
export.ps1 switches to the SDK environment installed for the current checkout and uses the Python virtual environment recorded there. If that environment is missing or invalid, the script prompts according to the saved preference. Choosing to update is equivalent to running .\install.ps1 update. If you decline, you can run plain .\install.ps1 to install a new environment for the current SDK, or run .\install.ps1 update to try updating the currently selected old environment.
Note
If you have set a custom tool installation path according to the above instructions, then you must set the SIFLI_SDK_TOOLS_PATH variable before running the export.ps1 script
cd C:\OpenSiFli\SiFli-SDK
$env:SIFLI_SDK_TOOLS_PATH="D:\SIFLI\tools"
.\export.ps1
Note
Each time you open a new terminal window, you need to run the export.ps1 script once in the SDK root directory to set environment variables. Note that this script must be run in the SDK root directory, otherwise it will cause execution failure or compilation errors.
Note
export.ps1 validates the current SDK environment before exporting. If the local Python environment, tools, or Conan config do not match the current SDK, export.ps1 may prompt to repair the environment or fail deterministically in non-interactive shells.
export.ps1 requires uv in PATH to run the SDK environment management flow.
Offline or Intranet Use
If your computer cannot access the Internet, you can activate an existing local environment offline, provided that .\install.ps1 has completed successfully and the environment is still complete and compatible with the current SDK. Updating SDK code does not necessarily require reinstalling the environment. This depends on the environment compatibility check, not just whether the compiler version matches.
Before disconnecting, complete installation and successfully run export.ps1 with the same user account. Keep the SDK tools directory (by default, $HOME\.sifli), the uv cache, and the Python runtime managed by uv. If your project downloads external build dependencies, prepare those in advance as well.
In a PowerShell terminal without Internet access or with intranet-only access, run:
cd C:\OpenSiFli\SiFli-SDK
$env:UV_OFFLINE="1"
.\export.ps1 --offline
If you use a custom tools directory, first set SIFLI_SDK_TOOLS_PATH to the value used during installation.
UV_OFFLINE=1 prevents the outer uv startup process from accessing the network, using only local files and cached data. --offline enables offline mode for the SDK environment management flow. After activation succeeds, enter your project directory in the same terminal and run your build commands as usual.
Warning
Offline mode cannot supply missing dependencies. sifli-sdk-env.json (stored under $HOME\.sifli by default) records installed environment information. Its presence does not guarantee that Python, the toolchain, and cached data are still complete.
If Python is unavailable, cached dependencies such as rich or tomli_w are missing, or the environment is incompatible, prepare the required dependencies again with network access. Passing only --offline does not prevent network access during the outer uv startup process, so also set UV_OFFLINE=1.
These commands alone cannot perform a first-time installation on a fully disconnected computer. Intranet computers need installation dependencies prepared in advance or accessible internal dependency sources. Switching to a public mirror does not solve a complete lack of Internet access.
After restoring Internet access, remove the offline setting in the current terminal to allow uv to download or update dependencies:
Remove-Item Env:UV_OFFLINE -ErrorAction SilentlyContinue
Windows Terminal Quick Configuration
If you need to run SiFli-SDK frequently and want to automatically set environment variables each time you open the terminal, you can create a new Windows Terminal profile by following these steps:
Press Ctrl+, in Windows Terminal to open settings, click to add a new profile, select duplicate profile Windows PowerShell, then follow these steps:
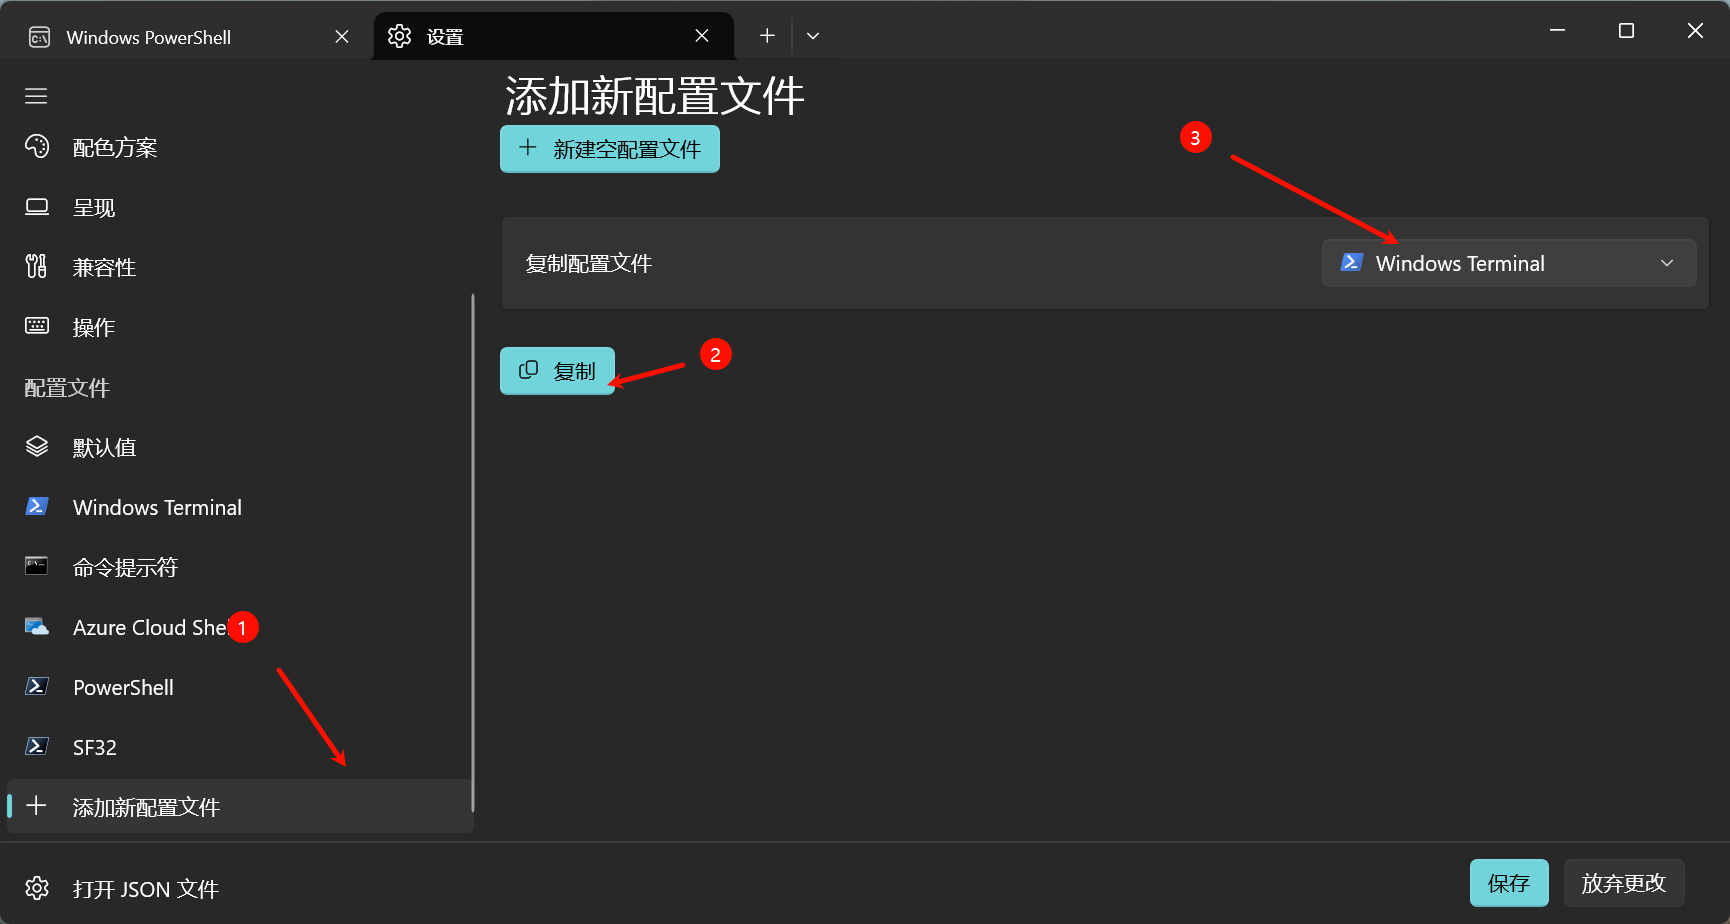
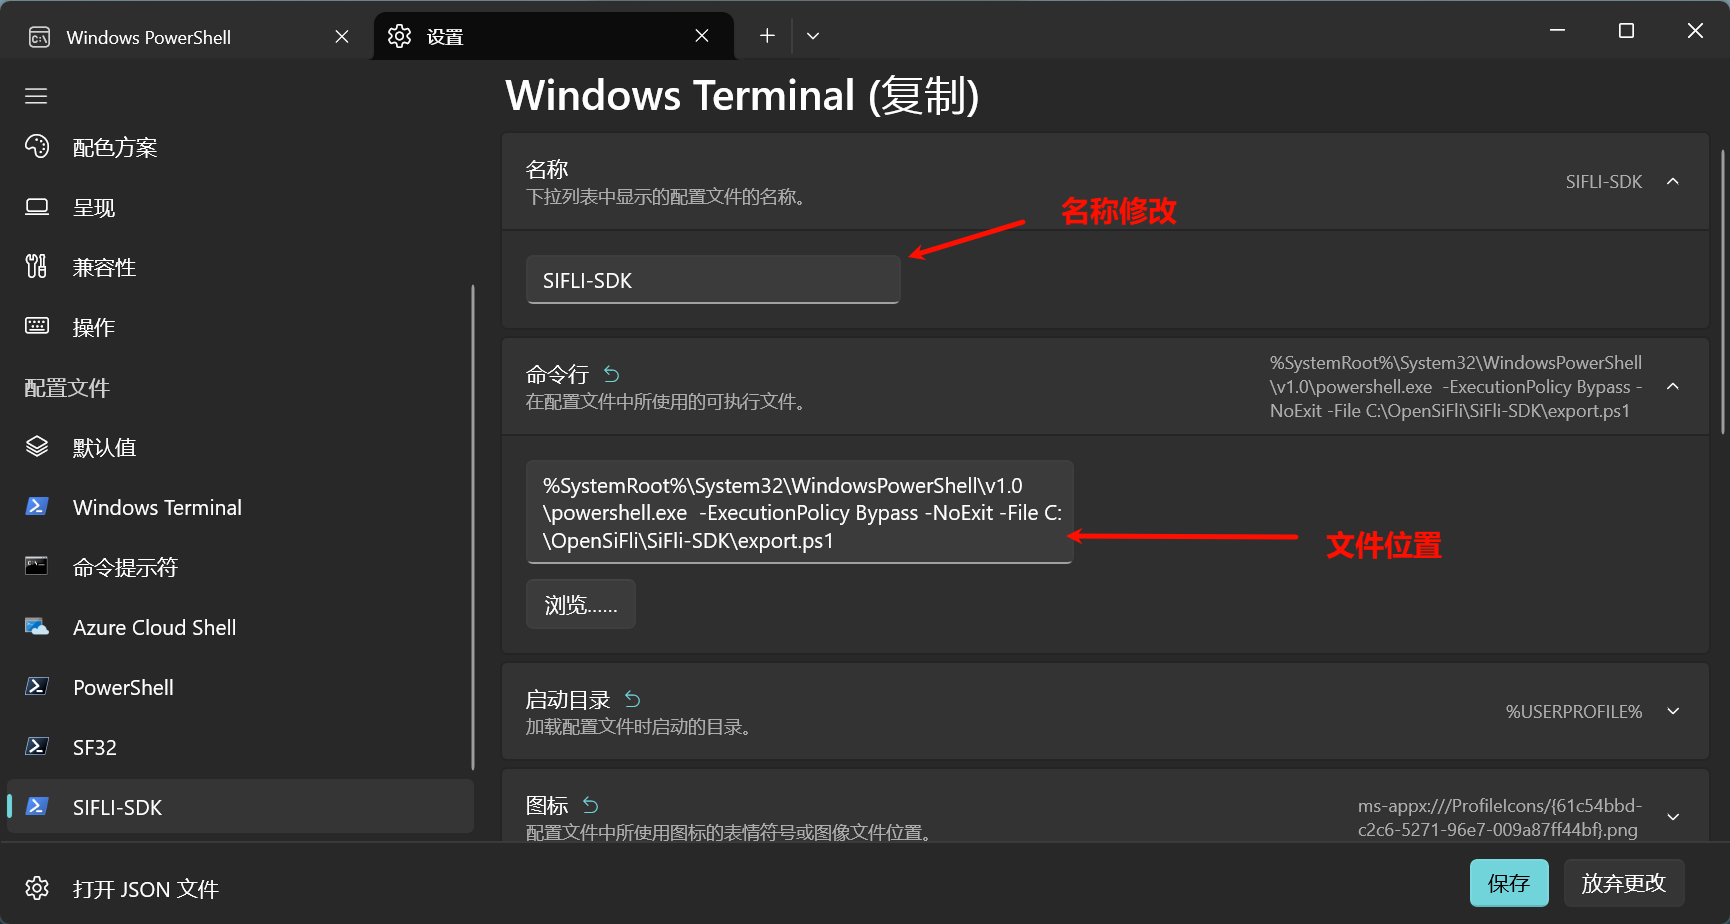
Change the name to SiFli-SDK
Change the command line configuration to the following, change the final export.ps1 file location to your SDK path
%SystemRoot%\System32\WindowsPowerShell\v1.0\powershell.exe -ExecutionPolicy Bypass -NoExit -File D:\SIFIL\SiFli-SDK\export.ps1
Change the starting directory to use parent process directory
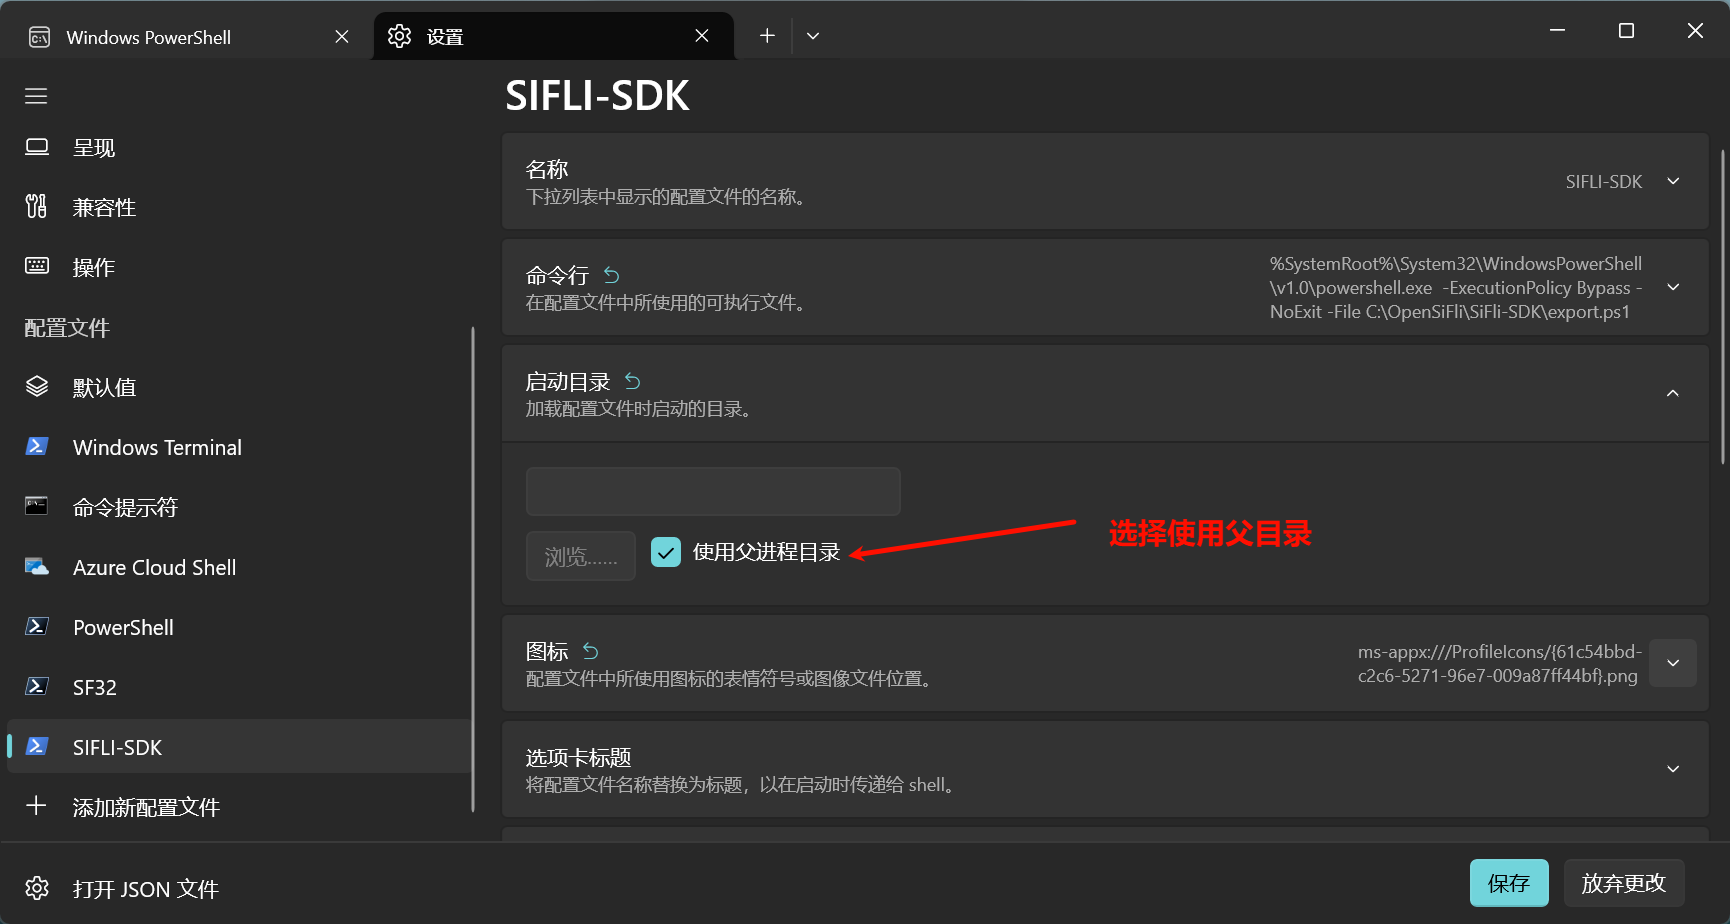
Other configurations can remain unchanged
Click Save
Subsequently, you only need to open Windows Terminal in any code directory, click the dropdown menu in the upper right corner, select SiFli-SDK, and the environment variables will be set automatically. In the newly opened window, you can use the SDK’s compilation and download commands.
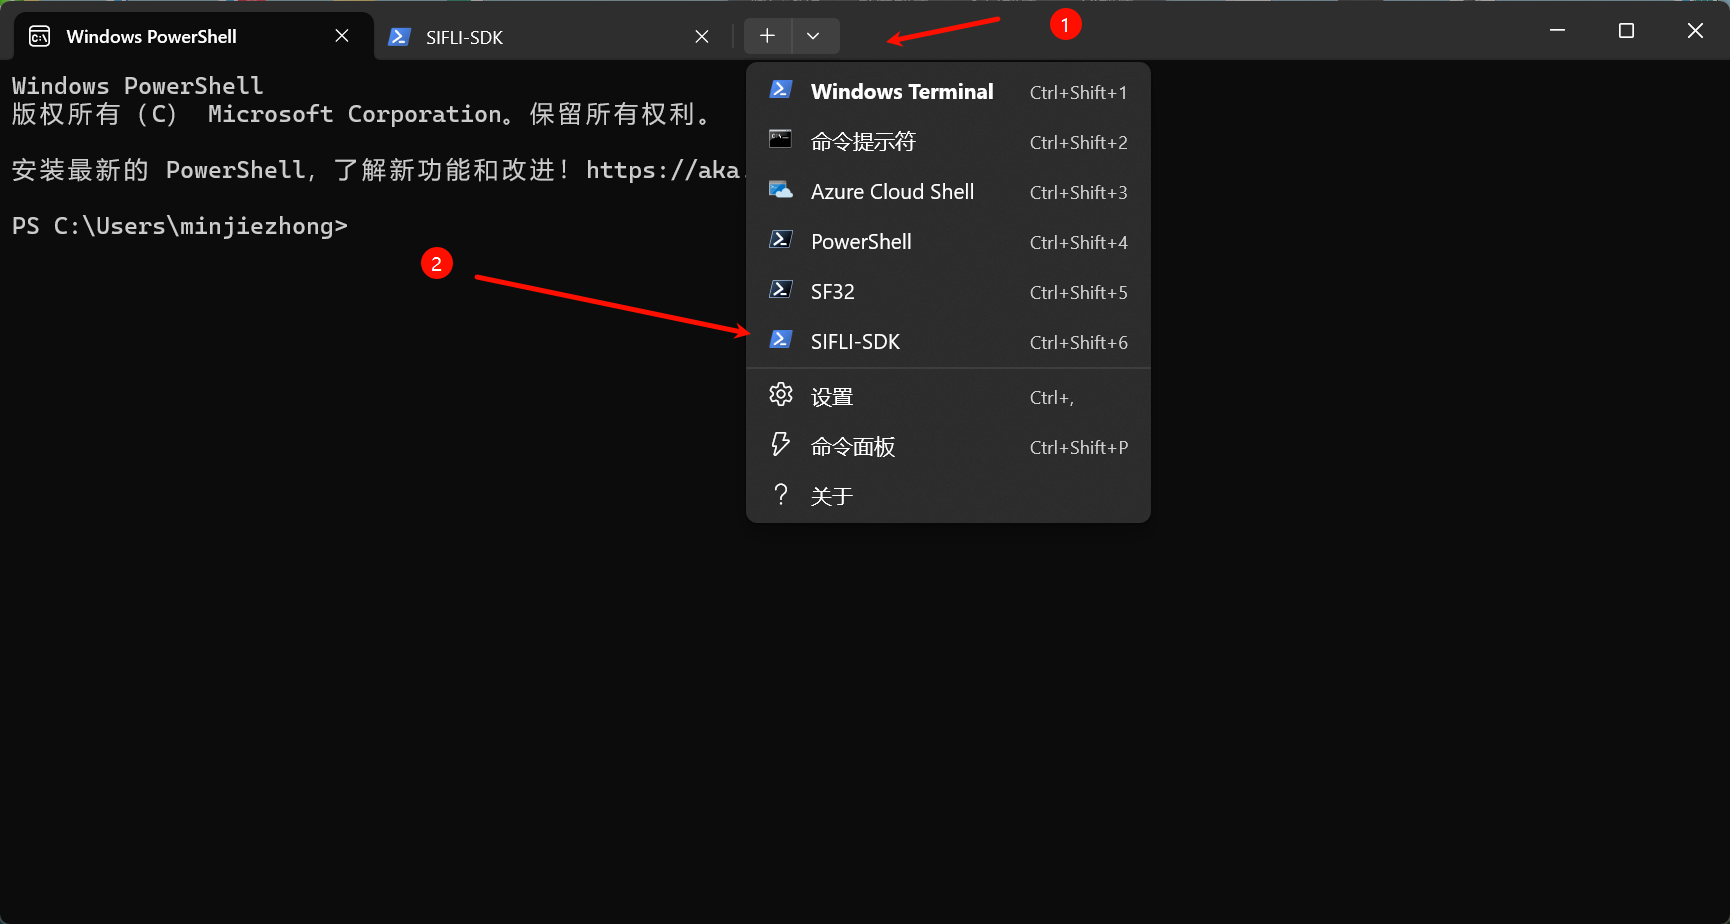
Check if Environment Setup is Successful
You can try compiling and downloading to see if it’s successful. For compilation and downloading, please refer to Build and Download