
Ozone Online Breakpoint Debugging Guide
This section describes how to use Ozone for breakpoint and step-by-step debugging.
1. Early Crash Breakpoint Setup
If the system crashes during the Bootloader phase, immediately after Bootloader, during early startup initialization (or during sleep wake-up), attaching J-Link directly is often too late. You can set breakpoints directly in the code.
Assembly level setup: Add a
B .infinite loop in theReset_Handlerofdrivers/cmsis/sf32lb5xx/Templates/arm/startup_bf0_hcpu.S(replace with the corresponding chip model).
Note: The path for startup_bf0_hcpu.S when compiling with GCC differs from Keil. The GCC path is: drivers/cmsis/sf32lb5xx/Templates/gcc/startup_bf0_hcpu.S
Reset_Handler   PROC
                B        . ; // First instruction executed after MCU reset, add breakpoint
C language level setup: Add an assembly-level breakpoint at the beginning of
SystemInit()orrtthread_startup().
__asm("B ."); // Set breakpoint
Or:
HAL_sw_breakpoint(); // Set breakpoint
Note
Do not use while(1); as a breakpoint, because compiler optimizations may discard all statements after it.
After setting this, the system will halt at that instruction. After connecting J-Link and Ozone, use the command setpc PC+2 to advance the PC register by 2 bytes to skip the breakpoint, then you can start step-by-step tracing.
2. Ozone Debugging Guide
Ozone is SEGGER’s official full-featured debugger, which is more stable than Keil for crash investigation and multi-core debugging.
2.1 Creating an Ozone Project and Connecting
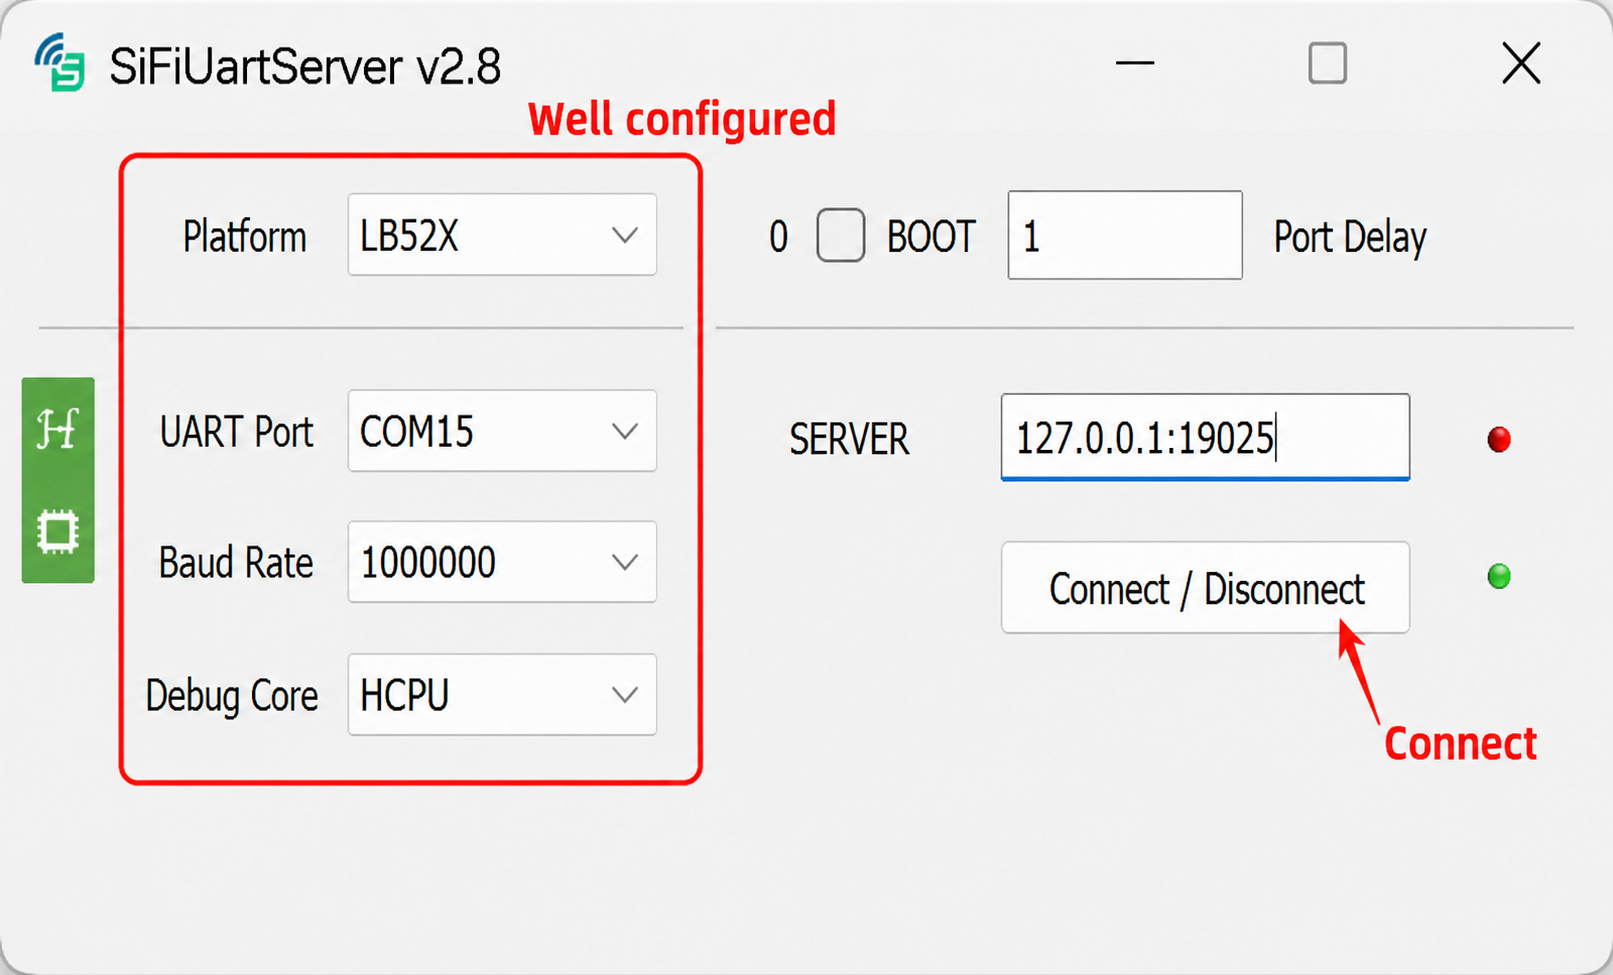
The 52 series MCU does not have an SWD interface. To use Ozone for debugging, you can use the SiFliUsartServer.exe tool. Configure it as shown below:
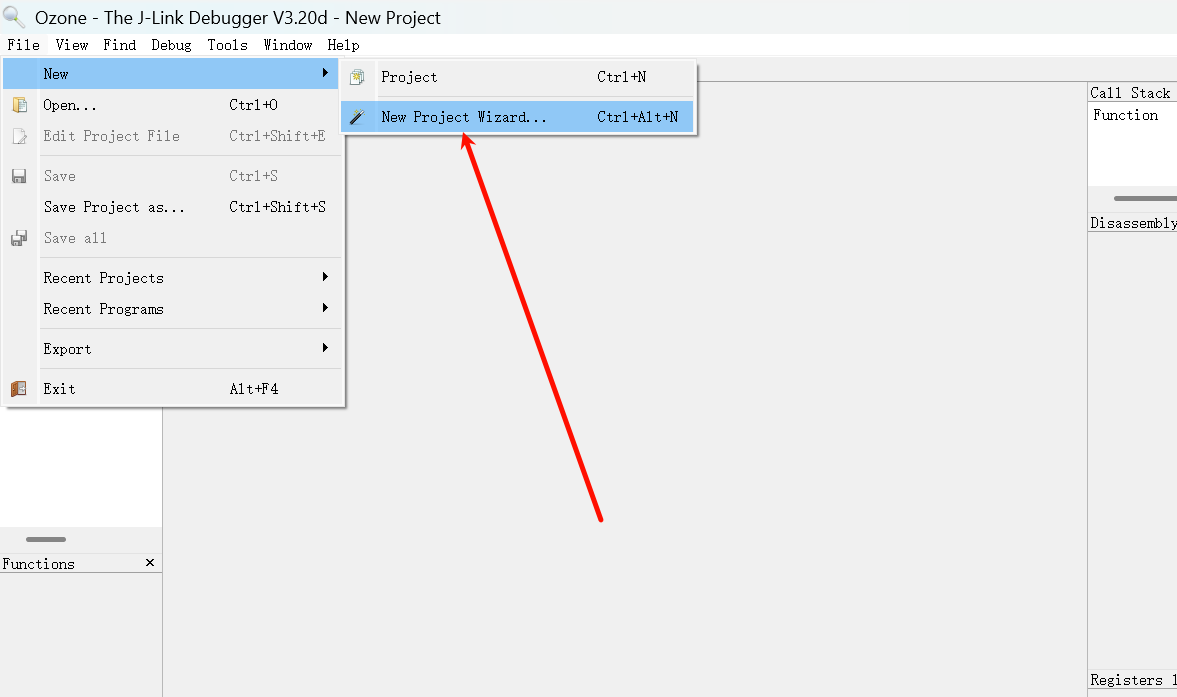
Create a new project: Open Ozone and create a new project.
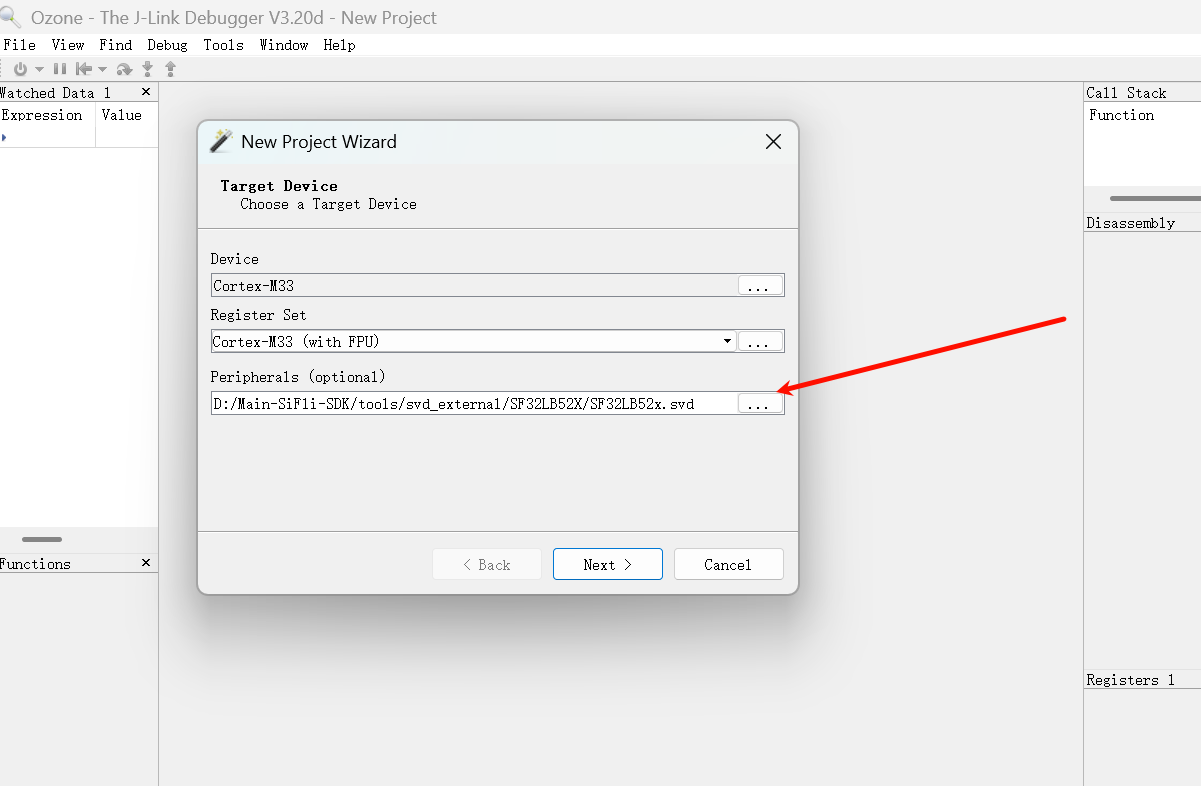
Select the debug chip: Navigate to the SIFLI-SDK\tools\svd_external path and select the corresponding chip model directory to open and select the SVD file.
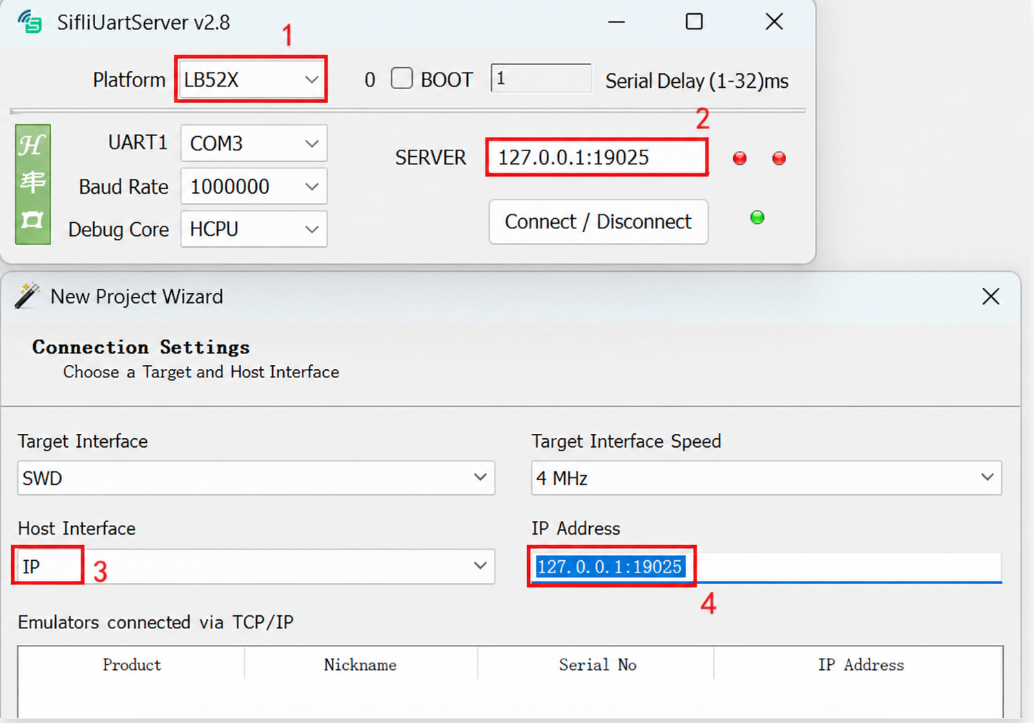
Select connection interface: Enter the IP virtualized by SiFliUsartServer as shown.
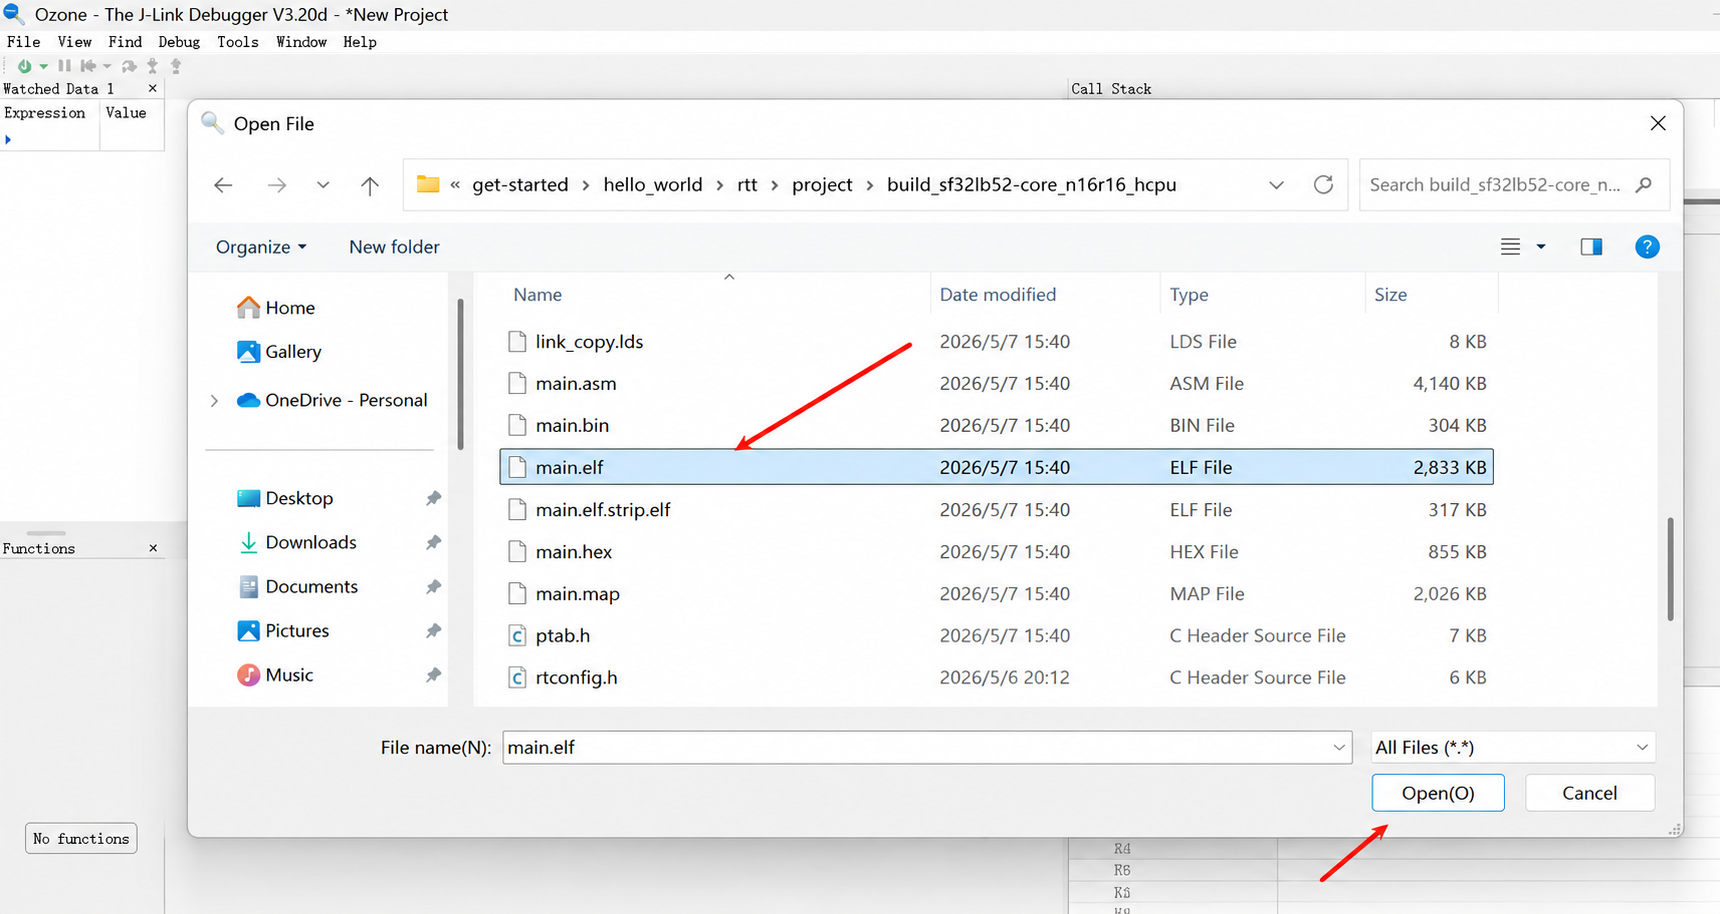
Select firmware: Select the compiled *.axf or *.elf file. Note the file extension difference: Keil-compiled files have the .axf extension, while GCC-compiled files have the .elf extension.
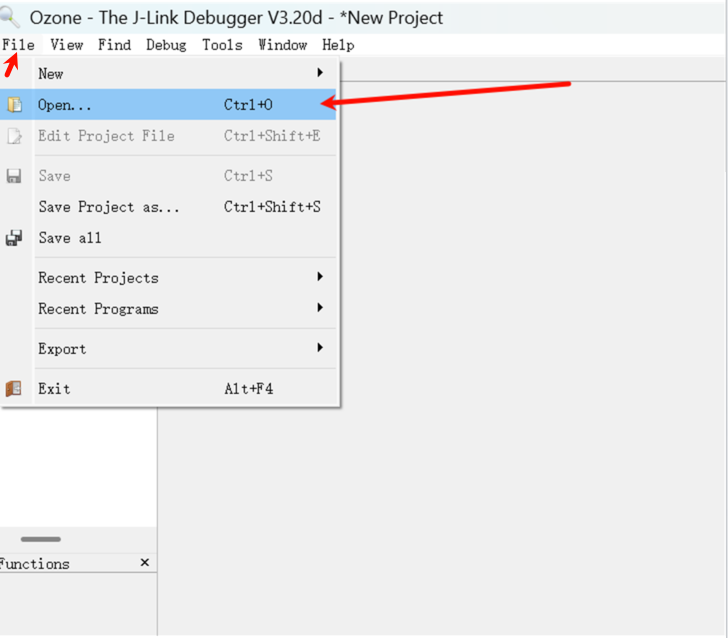
In Ozone, select File then Open, and find the firmware you want to import.
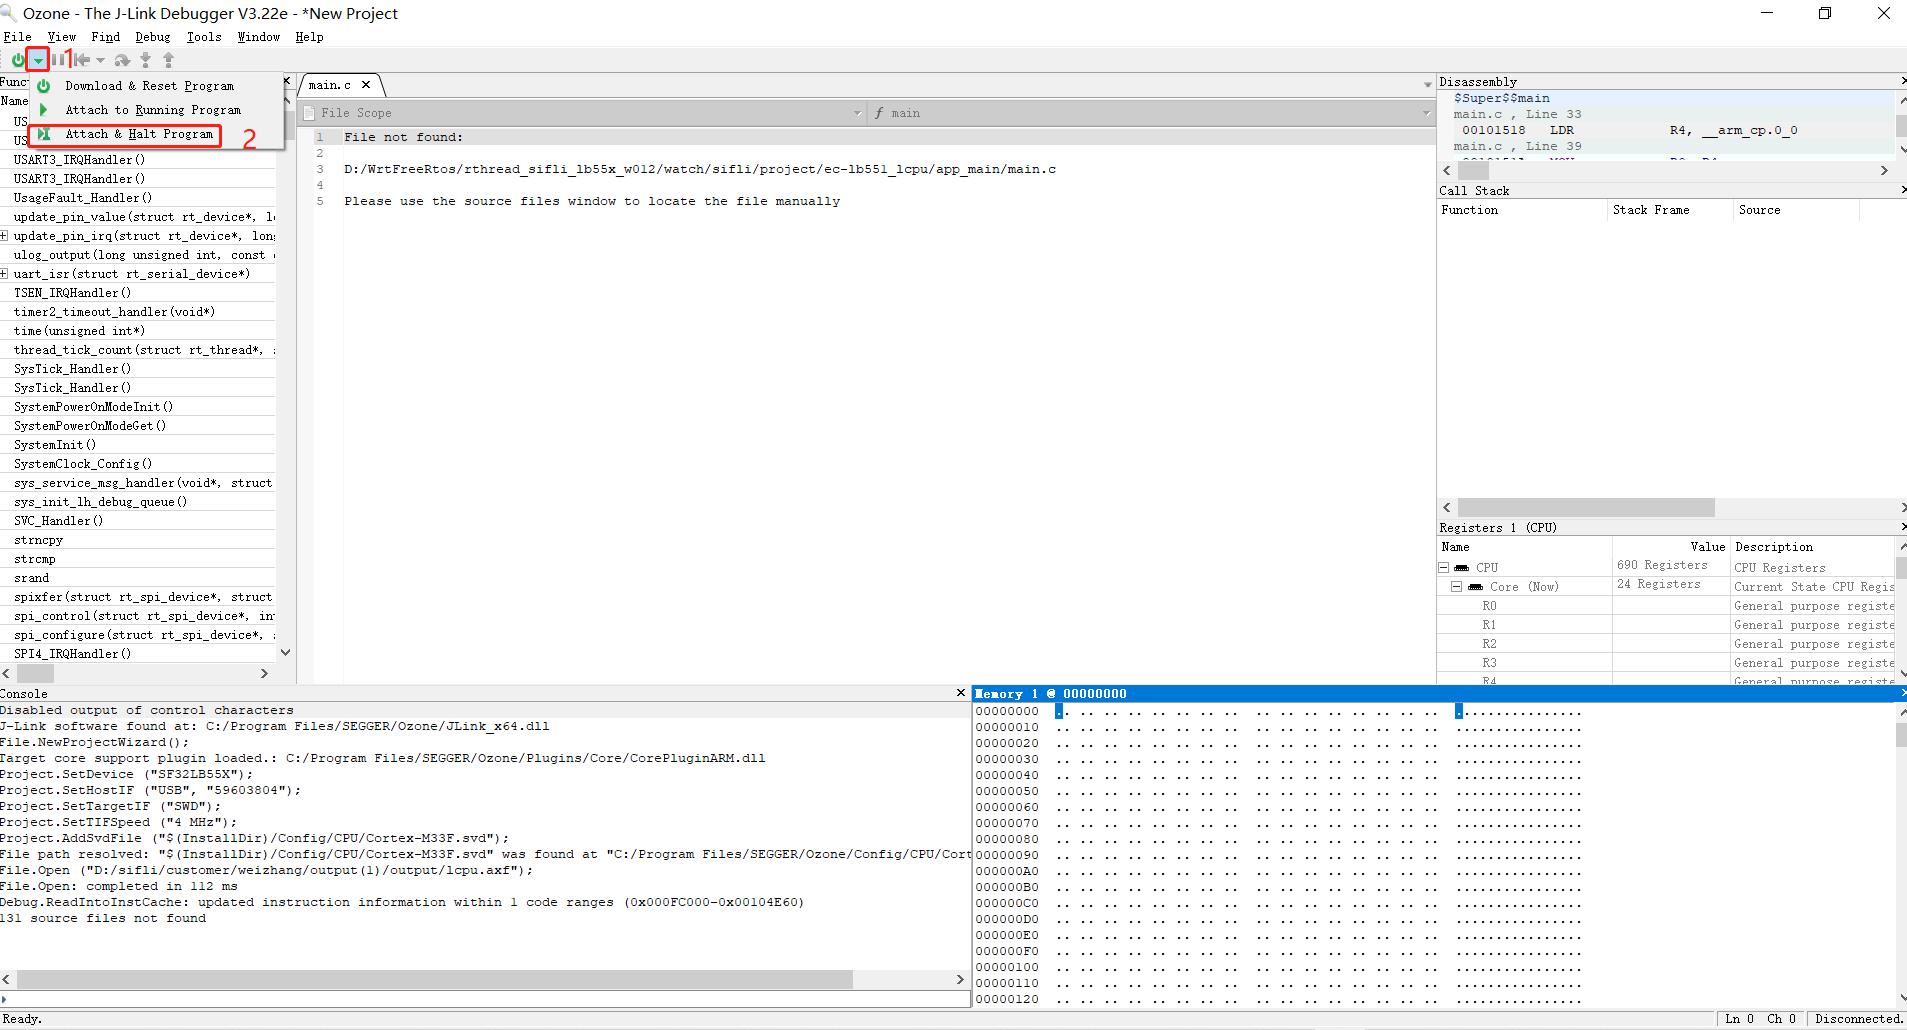
Attach to program:
Attach & Halt Program: Connect J-Link to the CPU and halt at the current PC pointer (recommended for crash investigation).
Attach & Run Program: Connect to the CPU and continue running from the current PC.
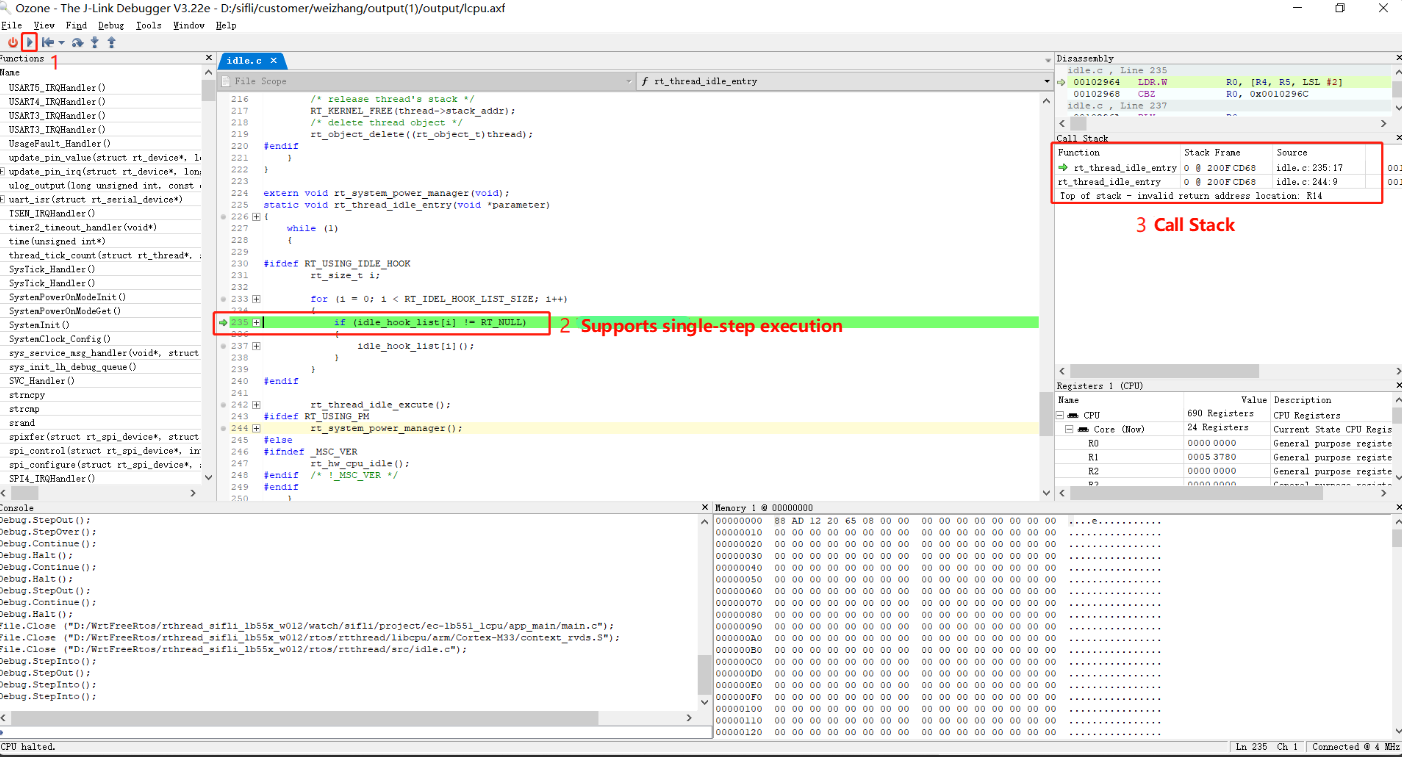
Start debugging: After clicking the run program arrow icon, the CPU can be stepped through. You can add breakpoints, view call stack information, and register states.
2.2 Common Ozone Debugging Issues
Issue 1: Target Connection Lost - Frequent Disconnections After Connecting
The following disconnection dialog frequently appears shortly after connecting, interrupting the debugging session:
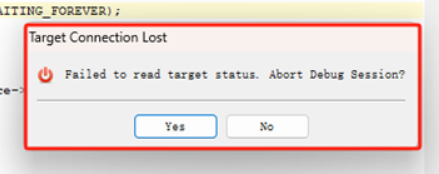
Cause and Solution:
This occurs because when connecting to Ozone for debugging, the Memory window is enabled by default and reads uninitialized (such as PSRAM) or non-existent memory addresses, causing read failures and disconnections. Before connecting for debugging, make sure to close Ozone’s Memory window and other unused windows.
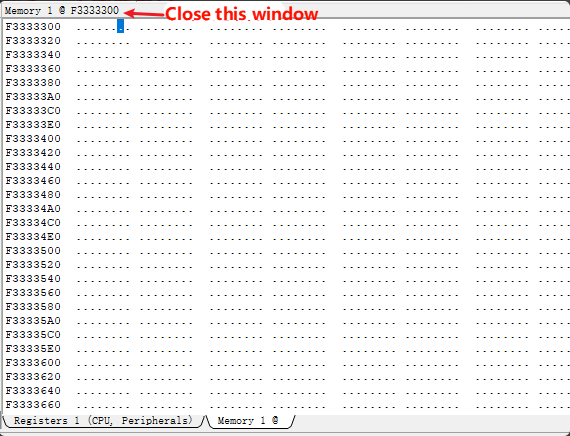
Issue 2: Enabling RT-Thread RTOS Thread Awareness in Ozone
To view system threads in Ozone, copy the plugin \tools\segger\RtThreadOSPlugin.js from the SDK to the Plugins\OS\ directory under the Ozone installation path. Reopen the project and enable Project.SetOSPlugin("RtThreadOSPlugin"); to switch and debug RT-Thread threads online.
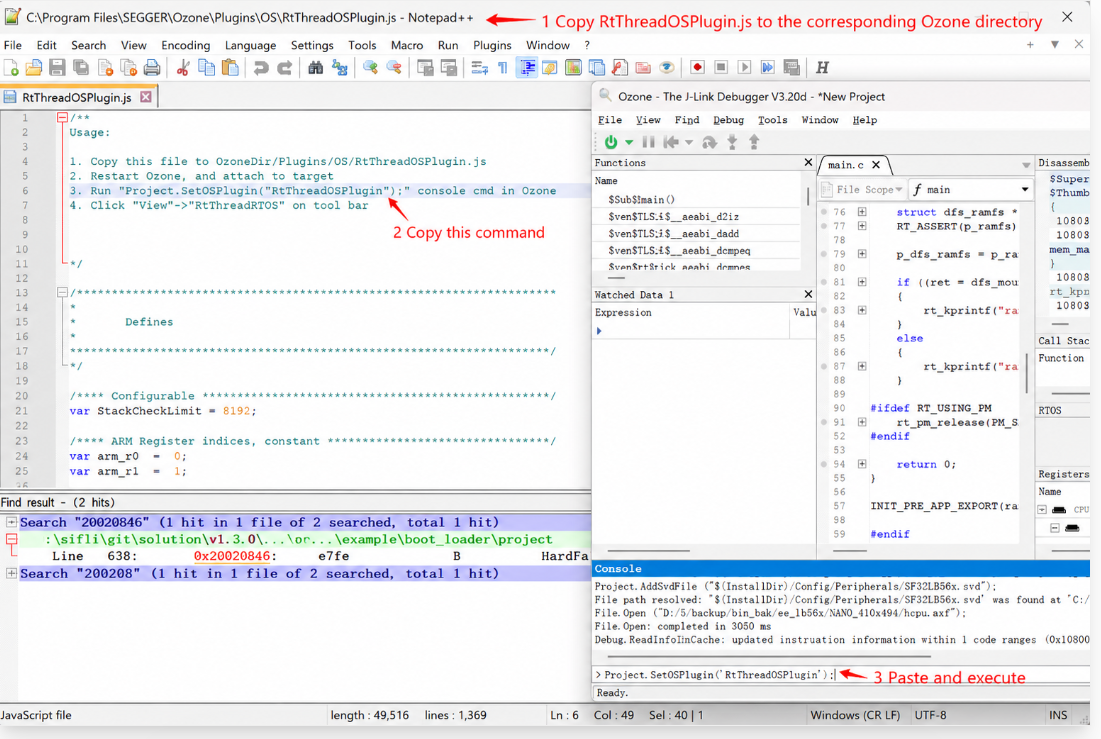
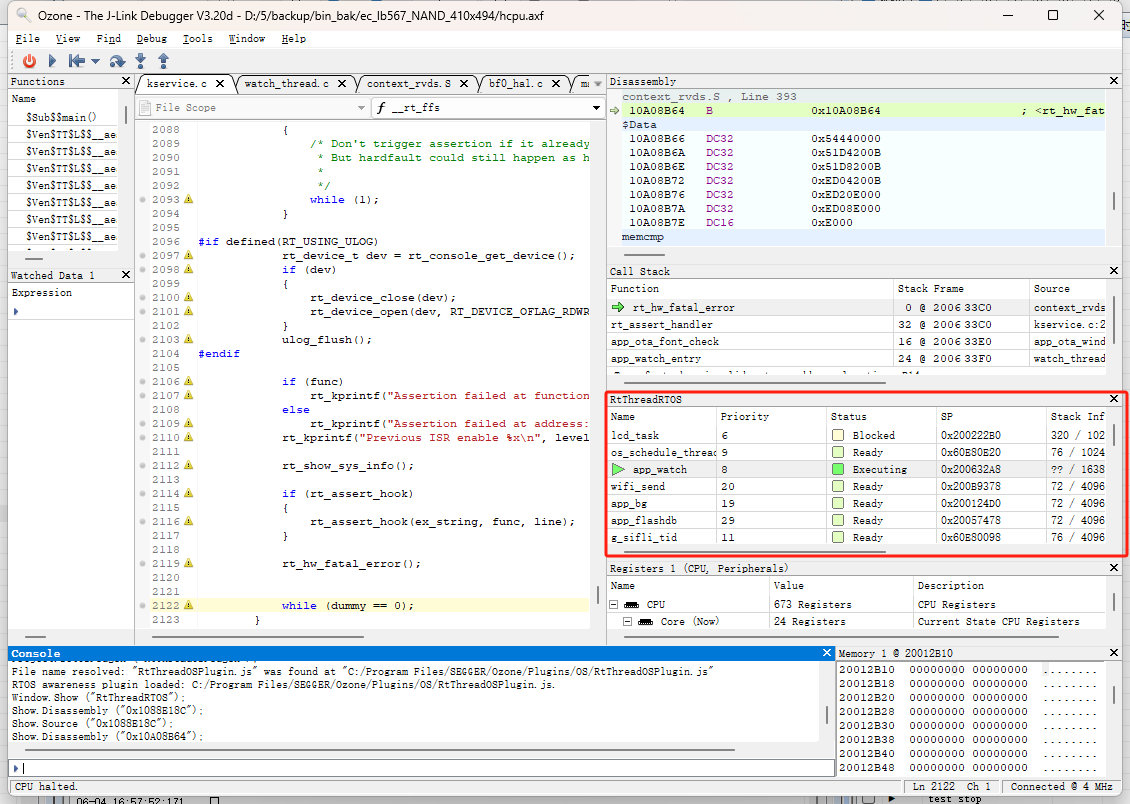
Issue 3: Ozone Shows “File not found” (Redefining Source Code Path)
When the flashed binary was not compiled locally (e.g., investigating a crash scene sent by someone else), Ozone shows File not found and cannot locate the C source code for step-by-step tracing.
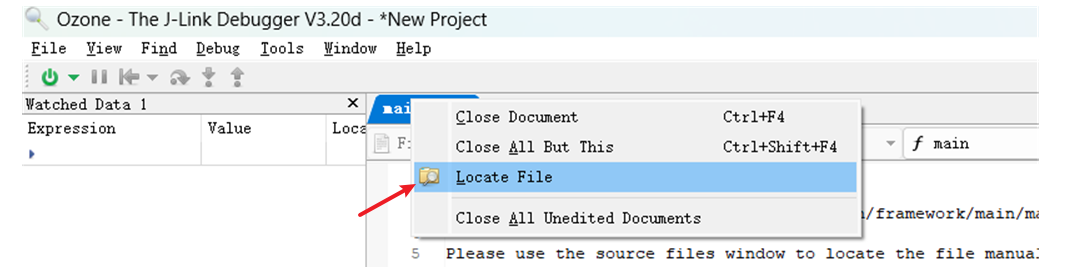
Solution:
Single file not found: Right-click the file, select
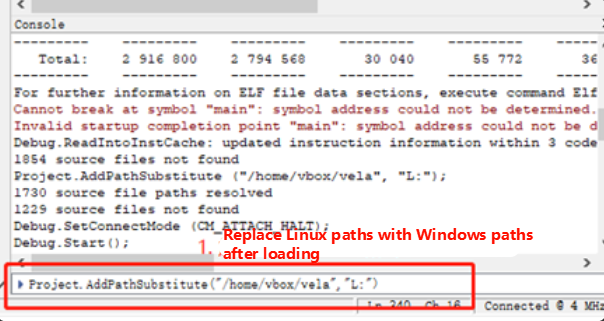
Locate File, and navigate to the corresponding local C source file.Batch file base address mismatch: Enter the
Project.AddPathSubstitutecommand in the Ozone command window to relocate the path. For example, replace the Linux compilation path in the ELF with the local Windows path.
Issue 4: Ozone Debug Connection Fails
Error shown:
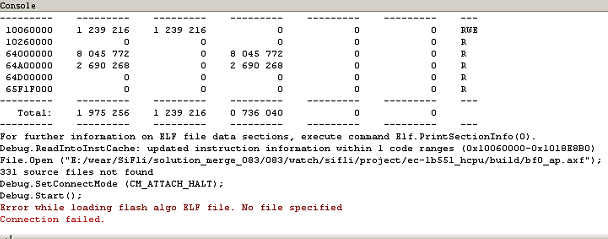
Solution: You need to add the flash driver and XML configuration file just like for J-Link, so that Ozone is supported.
C:\Program Files\SEGGER\Ozone\Devices\SiFli\SF32LB55X****.elf
C:\Program Files\SEGGER\Ozone\JLinkDevices.xml
# Different J-Link or Ozone versions may have the following paths:
C:\Users\yourname\AppData\Roaming\SEGGER\JLinkDevices.xml
C:\Users\yourname\AppData\Roaming\SEGGER\JLinkDevices\Devices\SF32LB55X****.elf